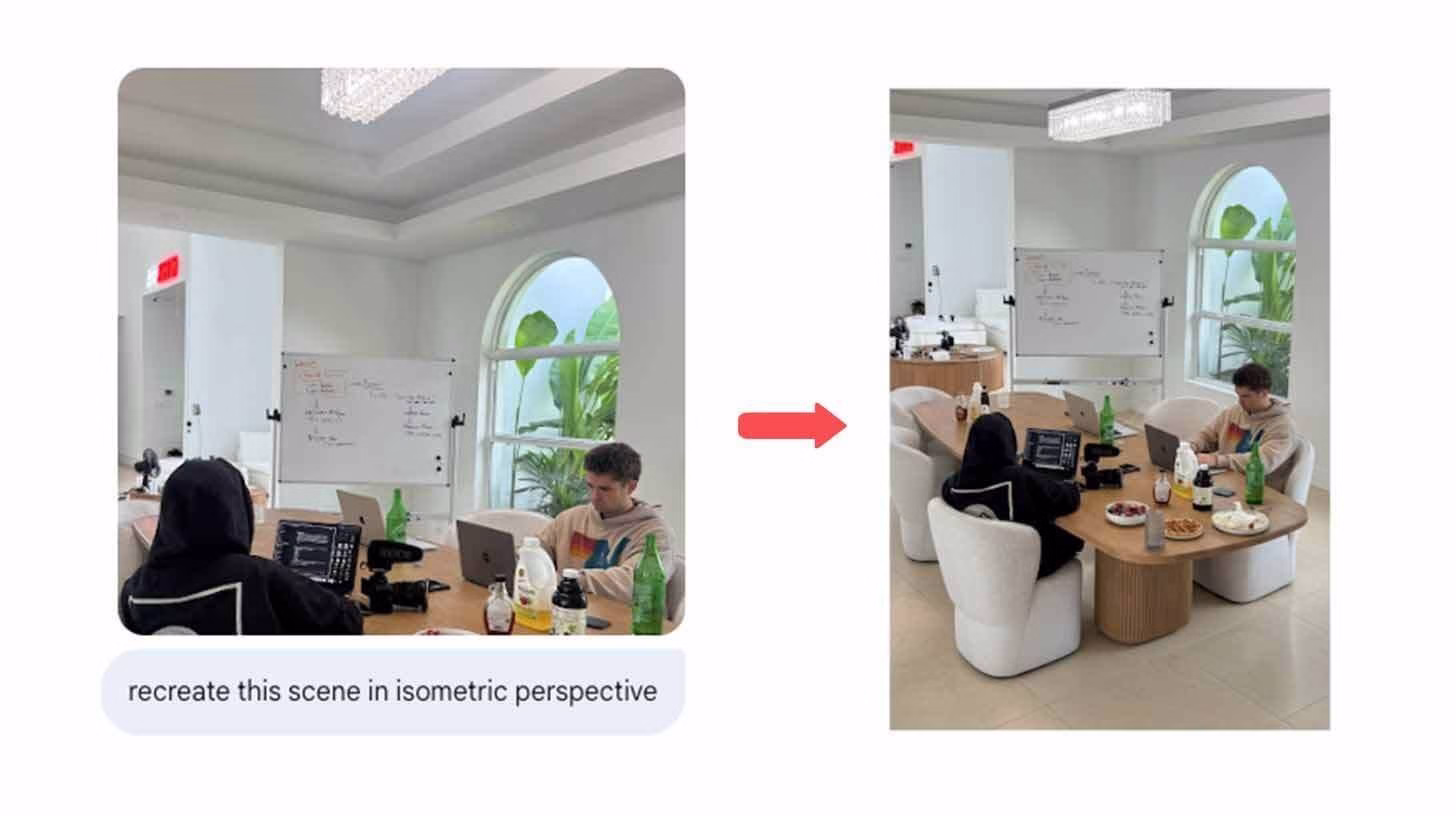
I’ve been testing Google’s Nano Banana model, and it’s one of the most useful tools I’ve come across for turning flat photos into something more dynamic.
Instead of sticking with basic 2D shots, you can flip any room or environment into a detailed isometric view. It’s not just a trick; it reveals angles, hidden corners, and details you couldn’t see before.
For creators and designers, this makes content mockups and interior previews far more engaging.
What makes Nano Banana stand out is how easy it is to refine. You don’t need to regenerate your photo from scratch each time you want a change. You just add prompts, tweak details, or even swap the entire environment while keeping the structure consistent.
Pair it with Google’s VEO, and you can go beyond still images into animated clips with motion and sound.
That’s why this workflow feels worth sharing.
Step-by-step tutorial with Nano Banana
Follow these steps to turn a photo into an isometric scene:
-
Go to gemini.google.com, enable Tools, and select Create Images. Look for the banana icon.
-
Upload a photo of a room or workspace.
-
Prompt: “Recreate this image in isometric view.” The model redraws the space in a bird’s-eye 3D-style layout.
-
Refine with edits instead of restarting. Try: “Make the room bigger” or “Add punk rock theme with minimalist chandelier.”
-
Swap backgrounds or features while holding the structure steady. Examples: “Change cityscape window to ocean view” or “Add natural sunlight and a door to another room.”
-
Save versions at each stage so you can compare or branch into different directions.
These steps give you a solid workflow that balances speed with creative control.
Practical use cases for creators
For content creators, Nano Banana makes it easy to keep visuals fresh without starting from scratch.
You can use the same base room but present it in different styles for social posts, campaigns, or mood boards. Minimalist one day, punk-inspired the next.
That consistency in structure helps your content look professional and intentional.
Designers can use it as a fast prototyping tool. Instead of manually mocking up variations in 3D software, you can upload a single photo and try multiple edits in minutes.
Change layouts, swap themes, or test lighting before committing to a full design. It’s especially useful for pitching options to clients when you want several polished variations on the table quickly.
Even hobbyists can get value from it. Whether you’re playing with interior aesthetics for your own space or just creating unique visuals to share online, the model gives you flexibility and speed.
Advanced tips for sharper results
The quality of your edits depends on how specific your prompts are. Use clear nouns and modifiers. Instead of asking for “make it modern,” ask for “replace sofa with white leather sectional.”
The model handles object swaps and scaling well when you’re direct.
Break complex edits into smaller steps. If you want a larger room with blue walls and Scandinavian furniture, don’t request it all at once.
Expand the room first, then adjust the color, then add the furniture. Each layer builds on the last, keeping proportions stable.
Save checkpoints after major changes. This lets you branch different looks from the same base. One version could lean industrial, another coastal, and another minimalist.
Having multiple branches means you won’t lose progress and can revisit earlier directions.
Adding motion with VEO
Once you’ve locked in your best still image, upload it into Google’s VEO. This tool can animate the scene with simple action prompts.
For example: “Make this room lively by adding two dogs running through.” VEO not only shows the motion but also adds light sound effects that fit the edit.
This step takes your visuals from static to immersive. A client looking at an interior mockup can suddenly see movement, lighting changes, and atmosphere.
Small touches like curtains swaying or doors opening make the environment feel alive.
Keep it simple. One or two movements per render produce the best results. Too many actions at once can break the flow.
Think of VEO as a finishing touch to give your scene presence.
Pro tip
The real advantage of Nano Banana is how it edits without breaking the image. Most AI tools reset with each change, but here you can work iteratively.
That makes it ideal for testing quick variations and creating polished series of visuals.
I’ve used it to keep consistent branding across content while experimenting with styles.
The same base room can appear in a minimalist set, then shift to a colorful eclectic theme, and later become a dark moody loft. Each version feels unique, but the structure holds them together.
When paired with VEO, the workflow goes beyond mockups. You can deliver animated previews that grab attention in a way static posts can’t.
For me, that’s what makes this tool a keeper. It saves time, fuels creative ideas, and makes design work more engaging.