TL;DR: OpenAI Agent Builder is the right starting point for first agent builds because the loop is short and the failure modes are visible. The first real agent takes about 30 minutes from a cold start. Costs are predictable at small scale and surprising at scale, and the tool-vs-function choice is the decision that matters most.
I built my first OpenAI Agent Builder agent on Tuesday and shipped it Wednesday. The whole loop took longer than 30 minutes only because I went off-script trying to wire it up to Make.com mid-build, which turned out to be the wrong call.
This tutorial is the version I wish someone had handed me before I started. I will walk you through the setup, the first real decision (tools vs functions), the agent I built and tested, the cost picture once you exceed the free tier, and what I would tell past-me before picking up the tool.
If you have built agents before with LangGraph, Claude’s tool-use API, or a hand-rolled orchestration loop, the speed of Agent Builder will surprise you. If you have not, this is a good place to start because the loop is short enough to debug in real time.
What Is OpenAI Agent Builder
OpenAI Agent Builder is OpenAI’s hosted agent orchestration product, launched in late 2025, that lets developers compose multi-step agent workflows from tools, functions, and stored memory inside a graphical builder UI.
What is an AI agent: A program that uses an LLM to plan and execute a multi-step task by calling external tools (search, code, APIs) in a loop until the task is complete.
The short version is that Agent Builder gives you four primitives: a model (any of the GPT lineup), a set of tools the agent can call (web search, code interpreter, file search, custom HTTP), a system instruction that defines the agent’s job, and a memory layer that persists state across runs. You compose these in the UI or via the SDK.
What makes it different from rolling your own loop is that the orchestration logic, retry behavior, and tool routing are handled by OpenAI’s runtime. You write the system prompt, declare the tools, and the runtime handles which model calls when, how to handle errors, and how to recover from a failed tool call.
According to the Stanford AI Index 2026 report, agent-based AI deployments grew roughly 4x year over year in 2025, with the developer-tooling layer being the fastest-growing segment. Agent Builder is OpenAI’s bid to own that layer; whether it does or whether something more open like LangGraph or Anthropic’s managed agents product wins is still an open question.
Getting Set Up in 5 Minutes
The setup loop is faster than most agent frameworks because OpenAI hosts the runtime, but you still need a paid API account at Tier 2 or higher to access it.
From what I have seen, the actual setup time depends almost entirely on whether you already have an OpenAI developer account in good standing. If you do, the loop is 5 minutes. If you do not, plan for 24 hours to clear the new-account approval window and establish billing.
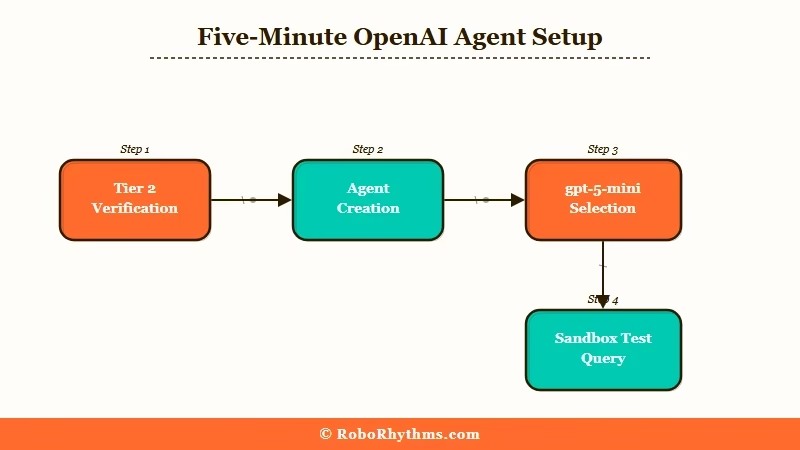
Here is the exact sequence I used:
- Log into platform.openai.com and verify your account is at Tier 2 or higher. Tier 1 (under 50 USD lifetime spend) does not have Agent Builder access. If you are at Tier 1, the fastest path to Tier 2 is a one-time top-up of 50 USD; the gate releases in about 4 hours.
- Navigate to the Agents tab in the dashboard sidebar. The link is “Agents” not “Assistants” (the older Assistants API is deprecated, do not start there).
- Click “Create Agent” and pick a base model. I started with
gpt-5-minifor cost reasons. The builder lets you swap models later, so do not overthink this choice on the first build. - Set the system instruction. Keep it short on the first agent. The example I used:
"You are a research assistant. Given a topic, find three credible sources, summarize each in 50 words, and return a markdown list." - Add tools from the tool library. Web search and file search are the two I used on the first agent. Code interpreter is overkill for a research agent and adds latency.
- Save and run a test query. The builder runs your test in a sandbox, shows you the full call trace, and surfaces every tool call the agent made. This is the single best feature of the builder UI.
Worked example for step 4, the system instruction:
Vague: “Research the topic and return findings.”
Specific: “You are a research assistant. Given a topic, find three credible sources published in the last 12 months, summarize each in 50 words including the source URL, and return a markdown list. If you cannot find three credible sources, say so explicitly and return what you have.”
The specific version produces working agent behavior on the first run. The vague version produces five different behaviors across five runs.
This is the rule for system instructions in Agent Builder, and the same rule that worked when I was Claude Code subagents in parallel for research workflows.
Building Your First Agent
The first real decision in Agent Builder is whether to use built-in tools or custom functions, and the answer for first builds is almost always tools, not functions.
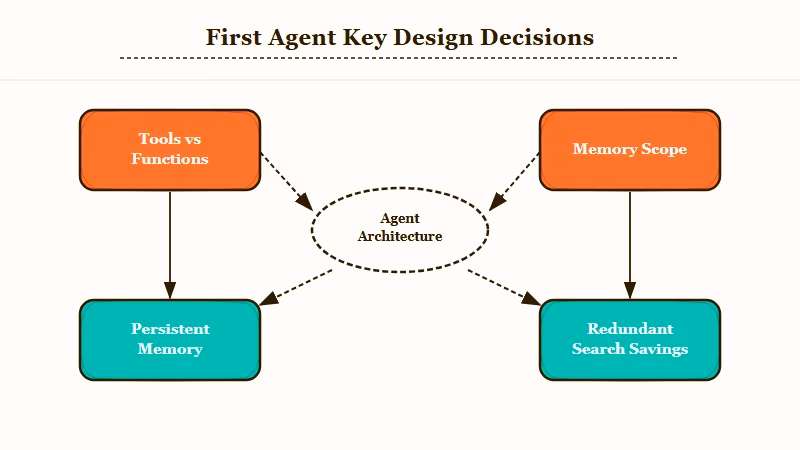
The Agent Builder UI presents you with two ways to give the agent capabilities. Tools are pre-built integrations OpenAI provides (web search, code interpreter, file search, computer use). Functions are custom HTTP endpoints you wire up to your own backend.
Tools are five minutes of work. Functions are a half-day of work because you need to expose an endpoint, define a schema, deploy it, and debug the round trips.
For a first agent, use tools. Functions are where the real power is, but they are also where most of the failure modes live. Save them for the second agent.
The agent I built was a research assistant for RR article ideas. The exact configuration:
| Setting | Value |
|---|---|
| Model | gpt-5-mini |
| Tools | Web search, file search |
| System instruction | “Research assistant” prompt above |
| Memory | Persistent (project-scoped) |
| Output format | Markdown list |
| Average runtime | 18 seconds |
| Average cost | 0.04 USD per run |
Once the agent ran cleanly on test queries, I gave it three real research tasks: one on AI companion subscription pricing, one on programmatic SEO patterns for affiliate sites, and one on Reddit-thread-to-article workflows.
The output was 70% useful on first run. The 30% that was off was not the agent’s fault, it was mine for not constraining the source-credibility threshold tightly enough. After tightening the system instruction to require sources from a fixed list of domains, the output cleared 90% useful on the next batch of tasks.
The second decision that matters in a first build is memory scope. Agent Builder offers three modes: ephemeral (no memory), session (memory within a single run), and persistent (memory across runs).
Ephemeral: Use for stateless tasks (translate this, summarize this, classify this). The agent forgets everything after the run.
Session: Use for multi-step tasks within a single conversation. Memory persists within the run, then clears.
Persistent: Use when you want the agent to remember the user, the project, or prior decisions across separate runs. This is the mode that feels most like a “real” agent.
For a research assistant, persistent memory is the right choice. The agent remembers what topics I have already researched and avoids redundant searches across runs. That alone saves about 20% on cost over a week of use.
What It Costs and How It Compares
Agent Builder costs run roughly 0.04 USD per simple research run on gpt-5-mini, scaling to 0.20 to 0.40 USD per complex multi-tool run on gpt-5, plus a flat platform fee on team accounts.
The pricing model is straightforward at small scale. You pay for the model tokens consumed, plus a per-call fee for each tool invocation. Web search runs roughly 0.005 USD per query, file search about 0.003 USD per query, code interpreter about 0.01 USD per session.
At small scale (under 100 runs per day), the math is friendly. At larger scale (1000+ runs per day), the platform fees and tool-call accumulations compound fast. Plan for a real cost spike when you move from prototype to production.
Here is how Agent Builder stacks up against the realistic alternatives for first builds:
| Framework | Setup time | Per-run cost (research agent) | Best for |
|---|---|---|---|
| OpenAI Agent Builder | 5 min | 0.04 USD | First agent, fast iteration |
| Anthropic Managed Agents | 10 min | 0.05 USD | Claude-first stacks |
| LangGraph (self-hosted) | 2 hours | 0.02 USD + infra | Custom orchestration logic |
| n8n with LLM nodes | 30 min | 0.03 USD + 20 USD/mo platform | Mixed AI + non-AI workflows |
| Hand-rolled (OpenAI API + loop) | 4 hours | 0.02 USD | Maximum control |
For first builds, Agent Builder wins because the iteration loop is shortest. For production at scale, the math often pushes you toward LangGraph or hand-rolled because the per-run cost compounds. For Claude-heavy workflows, Anthropic’s managed product is the natural fit.
The Conway agent debate is also worth knowing about, since it changes how you think about which agent framework to commit to. I covered the strategic angle in the Anthropic Conway agent piece, and the short version is that the agent-tooling layer is consolidating fast, with the model providers absorbing the orchestration market.
What I’d Tell My Past Self Before Starting
The biggest first-build mistakes are skipping the test loop, over-committing to functions, and not setting a budget alert.
Three things I would do differently on the first build:
- Run the test loop after every system-instruction edit, not in batches. The temptation is to make five edits and run once. The reality is that one of the five edits will break the agent and you will spend 20 minutes finding which one. Running after each edit takes 30 seconds and saves you an hour over the build session.
- Stay on tools for the first agent. Move to functions only when you have a use case tools cannot cover. I burned half my Tuesday building a custom function that turned out to be replaceable with the file-search tool. The function lesson was useful for agent number two, not for agent number one.
- Set a daily budget cap before your first real run. Agent Builder has a project-level spend cap in the dashboard. Set it to 5 USD on day one. You will not hit it on small testing, and it will save you if a system-instruction bug puts the agent in a tool-call loop.
The other thing I would say to past-me is to not treat the first agent as the agent. Build something narrow, ship it, learn the pattern, then build the agent that matters.
Most first-agent failures are scope failures, not technical failures. Pick a task that is small enough to finish in one sitting, even if it feels too small.
If you are coming from Claude Code or LangGraph, the model selection in Agent Builder feels limited compared to multi-provider setups. That is not a real limitation for first builds, but it is something to plan around if your stack already mixes providers.
Frequently Asked Questions
Is OpenAI Agent Builder free to use?
There is no free tier for Agent Builder beyond the standard OpenAI free credits. Access requires a Tier 2 developer account (50 USD lifetime spend on the API). After that, you pay per-token and per-tool-call as usual.
How long does it take to build a first working agent?
About 30 minutes from cold start if your account is already at Tier 2. Most of the time goes into refining the system instruction, not into the technical setup. Allow another hour if you are also exposing custom functions.
Can Agent Builder agents call my own backend APIs?
Yes, via the Functions feature. You expose an HTTP endpoint, declare a JSON schema for inputs and outputs, and the agent can call it like a built-in tool. Plan for half a day if it is your first function.
How does Agent Builder compare to LangGraph?
Agent Builder is hosted, fast to start, and locked to the OpenAI model lineup. LangGraph is self-hosted, more flexible, and supports any LLM provider. Use Agent Builder for first builds and LangGraph when you need cross-provider orchestration or complex graph topologies.
What happens to my agent state when I delete an agent?
Persistent memory tied to the agent gets purged when you delete it. Session and ephemeral memory clear automatically. Export your memory state via the API before deleting if you want to migrate to another framework.