New hires walk into their role with a mix of curiosity and uncertainty. A scattered onboarding process only makes that harder, so a single workspace that carries all SOPs, prompts, and chats feels like a relief.
ChatGPT Projects offers exactly that kind of setup, and the process is straightforward when everything lives in one place.
I walk through how to build a private workspace, upload your files, and share it with anyone who needs access.
The steps come directly from the materials you provided, so nothing here stretches beyond those instructions. You’ll see how each action links together to form a clean onboarding flow that your new team member can follow without confusion.
Readers will pick up the core tasks involved, including preparing the project, storing procedures, starting the kickoff prompt, and keeping chats organized.
A few practical habits also show up along the way, such as balancing how much context you feed into the system.
PS: If you want to cut down the time you spend managing repeat tasks, Blaze Autopilot can handle a lot of that work in the background so you stay focused on your team.

How to set up a new Project for onboarding
A strong onboarding workflow begins with creating the workspace your new hire will use.
Everything else in the process connects back to this step, so the goal here is to establish a clean starting point.
Open ChatGPT at https://chatgpt.com/ and enable the sidebar so the Projects menu appears.
Select “Projects,” choose “New project,” and give it a clear name such as “Onboarding.”
Confirm the Project opens as an empty workspace where you can add files, instructions, and chats.
This gives you a dedicated place where all onboarding material will live. The new hire should never need to look elsewhere for files or guidance.
Every future action in this tutorial builds on top of this Project, so you avoid the common problem of scattered information.
Once the workspace exists, you have a controlled environment for the entire onboarding flow.
Your new team member will later receive access to this exact space, with every file, conversation, and instruction preserved.
How to add SOP files to the Project
Your SOPs form the foundation for the new hire’s learning, so you bring them into the Project next.
This step ensures ChatGPT can reference them directly during onboarding.
Upload each SOP file into the Project workspace.
Keep only the material the new hire truly needs so you avoid overloading the system.
Confirm the files now appear inside the Project where they remain accessible for every chat.
The document stresses the importance of balancing how much context you load, so this step is about clarity rather than quantity.
Each file you add becomes part of the Project’s memory and shapes how ChatGPT answers future questions. Your new hire benefits because every response they receive comes from the material you uploaded.
Once the SOPs are inside the workspace, the Project becomes the central reference point. The new hire can read the documents, ask questions, and stay anchored to the same source of truth throughout the process.
How to share the Project with your new hire
Sharing the workspace gives your new hire access to the files, memory, and chats you prepared.
This step turns the Project from a private setup into a shared environment they can use immediately.
Open the Project settings and select the option to add a collaborator.
Enter the new hire’s email so they receive access to the workspace.
Confirm they can now view every file, chat, and instruction inside the Project.
Sharing ensures the onboarding process stays contained in one place. Your new hire doesn’t need external folders or scattered links because everything sits inside the shared workspace.
They interact with the same material you created, and nothing gets lost in separate threads or tools.
Once they join, any chat you start inside the Project remains tied to the SOPs you uploaded, giving them consistent information from the first message onward.
How the new hire should begin their onboarding prompt
Your document provides a clear kickoff prompt that guides the new hire’s first interaction.
This step helps ChatGPT understand their role before onboarding begins.
Ask the new hire to start a chat inside the Project using Dictation mode if they prefer speed.
They should speak or type this exact prompt:
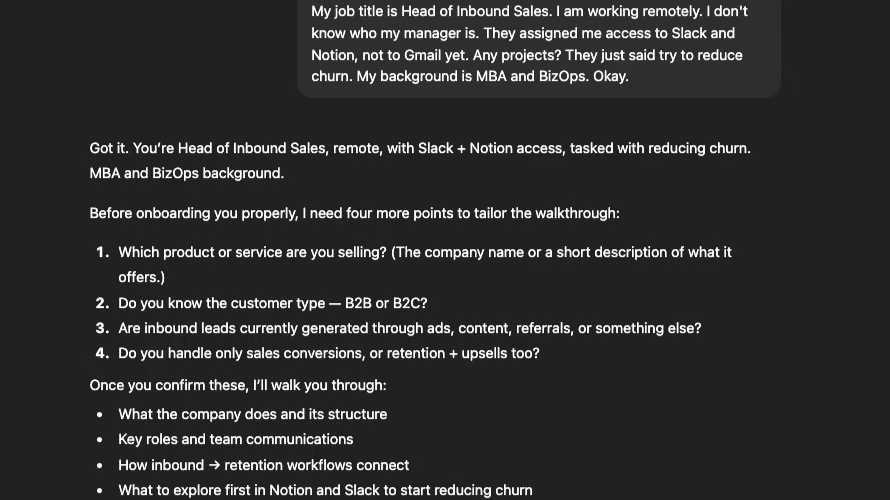
“I’m a new hire. Role: [title]. Goal: [objective]. Do not start yet. First, ask clarifying questions about my role before onboarding.”Once ChatGPT asks clarifying questions, the new hire answers them so the system can tailor the onboarding to their role.
This step sets context without overwhelming the system. The new hire signals who they are and what they aim to accomplish, and ChatGPT responds with targeted questions before moving into the rest of the onboarding flow.
This avoids confusion later and gives them a structured starting point.
The instruction to use Dictation mode is optional but helps reduce friction. The focus stays on accuracy and clarity, using only the steps described in your document.
How to manage chats and keep onboarding organized
Once the new hire begins asking questions from the SOPs you uploaded, the Project keeps every conversation tied to the same workspace.
This helps maintain a clean flow where nothing is lost in separate threads.
Tell the new hire to ask their onboarding questions directly inside the Project.
ChatGPT will pull answers from the SOP files you added earlier, keeping everything consistent.
When a specific chat thread contains useful guidance, you can share it by copying its chat link and sending it to the new hire.
This approach keeps the onboarding experience clear and controlled. Each conversation stays linked to the same files, so the new hire doesn’t drift into unrelated contexts.
They always receive responses based on the material you provided.
Your document also includes a practical tip that supports this structure. You keep memories limited to this Project, use Dictation mode for speed, and avoid loading excess context so the system remains responsive and accurate.
These habits help the entire process run smoothly without unnecessary complexity.
FAQs
1. How do you create a new Project in ChatGPT?
The document states the full steps: open ChatGPT at https://chatgpt.com/, enable the sidebar, select “Projects,” choose “New project,” and name it.
2. How do you upload SOP files into a ChatGPT Project?
It explains that you upload your SOP files directly into the Project and balance context to avoid overloading the AI’s memory.
3. How do you share a ChatGPT Project with a new hire?
It states you add the new hire’s email so they can access the workspace with all files, chats, and memory.
4. What prompt should a new hire use to begin onboarding?
The document provides the full sentence they should use:
“I’m a new hire. Role: [title]. Goal: [objective]. Do not start yet. First, ask clarifying questions about my role before onboarding.”
5. How should the new hire begin interacting with ChatGPT inside the Project?
It explains they should start with the kickoff prompt, then answer the clarifying questions ChatGPT asks before onboarding starts.
6. How can you share specific chat threads with a new hire?
The document states you copy the chat link and share it with them.
7. What tips help keep the onboarding process efficient inside a ChatGPT Project?
The document answers this by saying to use Dictation mode for faster work, limit memories to that Project only, and provide only necessary context.