When Nano Banana 2 dropped, I honestly wasn’t expecting much. Most AI image tools promise a lot and then fall apart the moment you try to do something specific.
But after spending time with it and running these prompts, I can tell you it’s a different story this time.
What caught my attention wasn’t just the image quality. It was how much less back-and-forth the whole process required.
With older tools, I’d spend 20 minutes tweaking a prompt just to get one usable frame. With Nano Banana 2, the first or second attempt was often close to exactly what I needed.
This tutorial walks through five prompt types that stood out to me: infographic generation, text rendering, subject consistency across multiple characters, cinematic 4K portraits, and multi-part storytelling.
Each one has a real use case behind it, and I’ll show you exactly how the prompts are structured so you can adapt them for your own content.
If you’ve been frustrated by AI image tools that feel like a guessing game, these prompts are worth your time.
Let’s get into it.
Adobe’s 2024 State of Create report found that more than 70 percent of creators are now experimenting with generative AI tools, and that infographic and illustration work has seen the fastest adoption inside that group. Nano Banana 2 is built for exactly that use case, which is why prompt structure matters more than the model picker for this kind of output.
How to Use Nano Banana 2 to Generate Infographics
One of the things that surprised me most about Nano Banana 2 is that it can now pull from real-world knowledge to build infographics, diagrams, and data visualizations without needing a separate design tool.
You write one prompt, and it assembles the visual story for you. That’s a meaningful shift for anyone who has ever tried to explain a process visually and ended up spending hours in Canva instead.
Here’s the prompt I used to test this:
“High-quality flat lay photography creating a DIY infographic that simply explains how the water cycle works, arranged on a clean, light gray textured background. The visual story flows from left to right in clear steps with hand-drawn black arrows.”
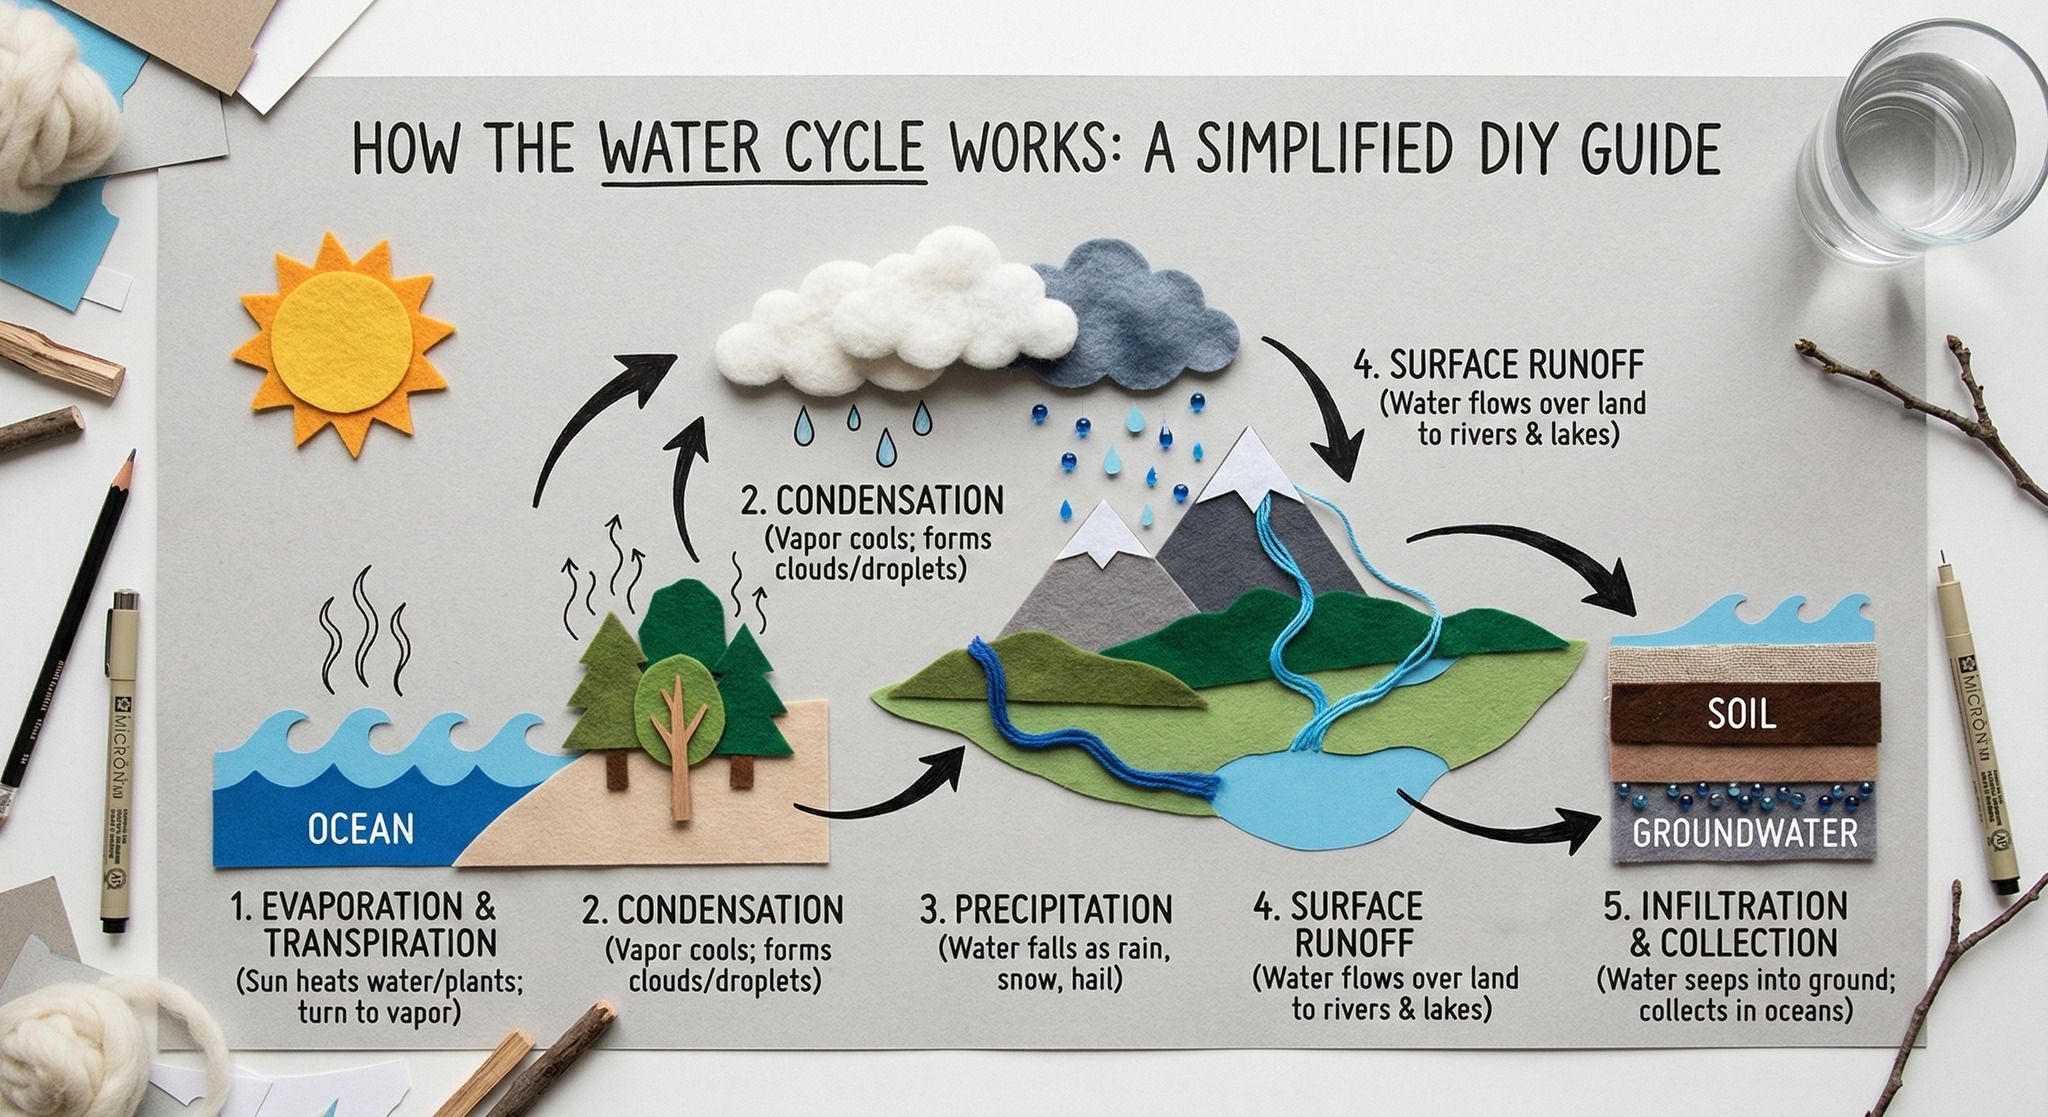
Three things make this prompt work:
- Photography style upfront: specifying “flat lay photography” tells the model the exact aesthetic before it starts building the scene
- Clear layout direction: “left to right with hand-drawn black arrows” gives the model a spatial structure to follow, so the output reads like an actual infographic
- A simple enough subject: keeping the topic concise lets the model’s knowledge base fill in the factual content without you spelling out every step
You can apply this same structure to almost any explainer topic. Swap out “water cycle” for “how a sales funnel works” or “the stages of content production,” and the format holds.
For content creators, this is most useful for:
- Blog headers that need to communicate a process at a glance
- Social carousels where each frame needs to carry real information
- YouTube thumbnails where visual clarity drives the click
It won’t replace a fully branded design from a professional tool, but for fast, clear visuals that actually communicate something, it gets the job done in a fraction of the time.
How Nano Banana 2 Handles Text Rendering in Realistic Scenes
Text rendering has been a weak spot for AI image models for a long time. Most tools either mangle the letters, place text awkwardly, or produce something that looks nothing like what you described.
Nano Banana 2 handles this noticeably better, especially when the text is embedded naturally into the scene rather than overlaid as a graphic element.
The prompt that demonstrates this well is:
“An intimate cinematic close-up of a small illustrated sign showing drawings of local birds and flowers. Delicate script reads: ‘Native Wildlife: Please Observe from a Distance.’ Soft diffused light filters through fern leaves.”
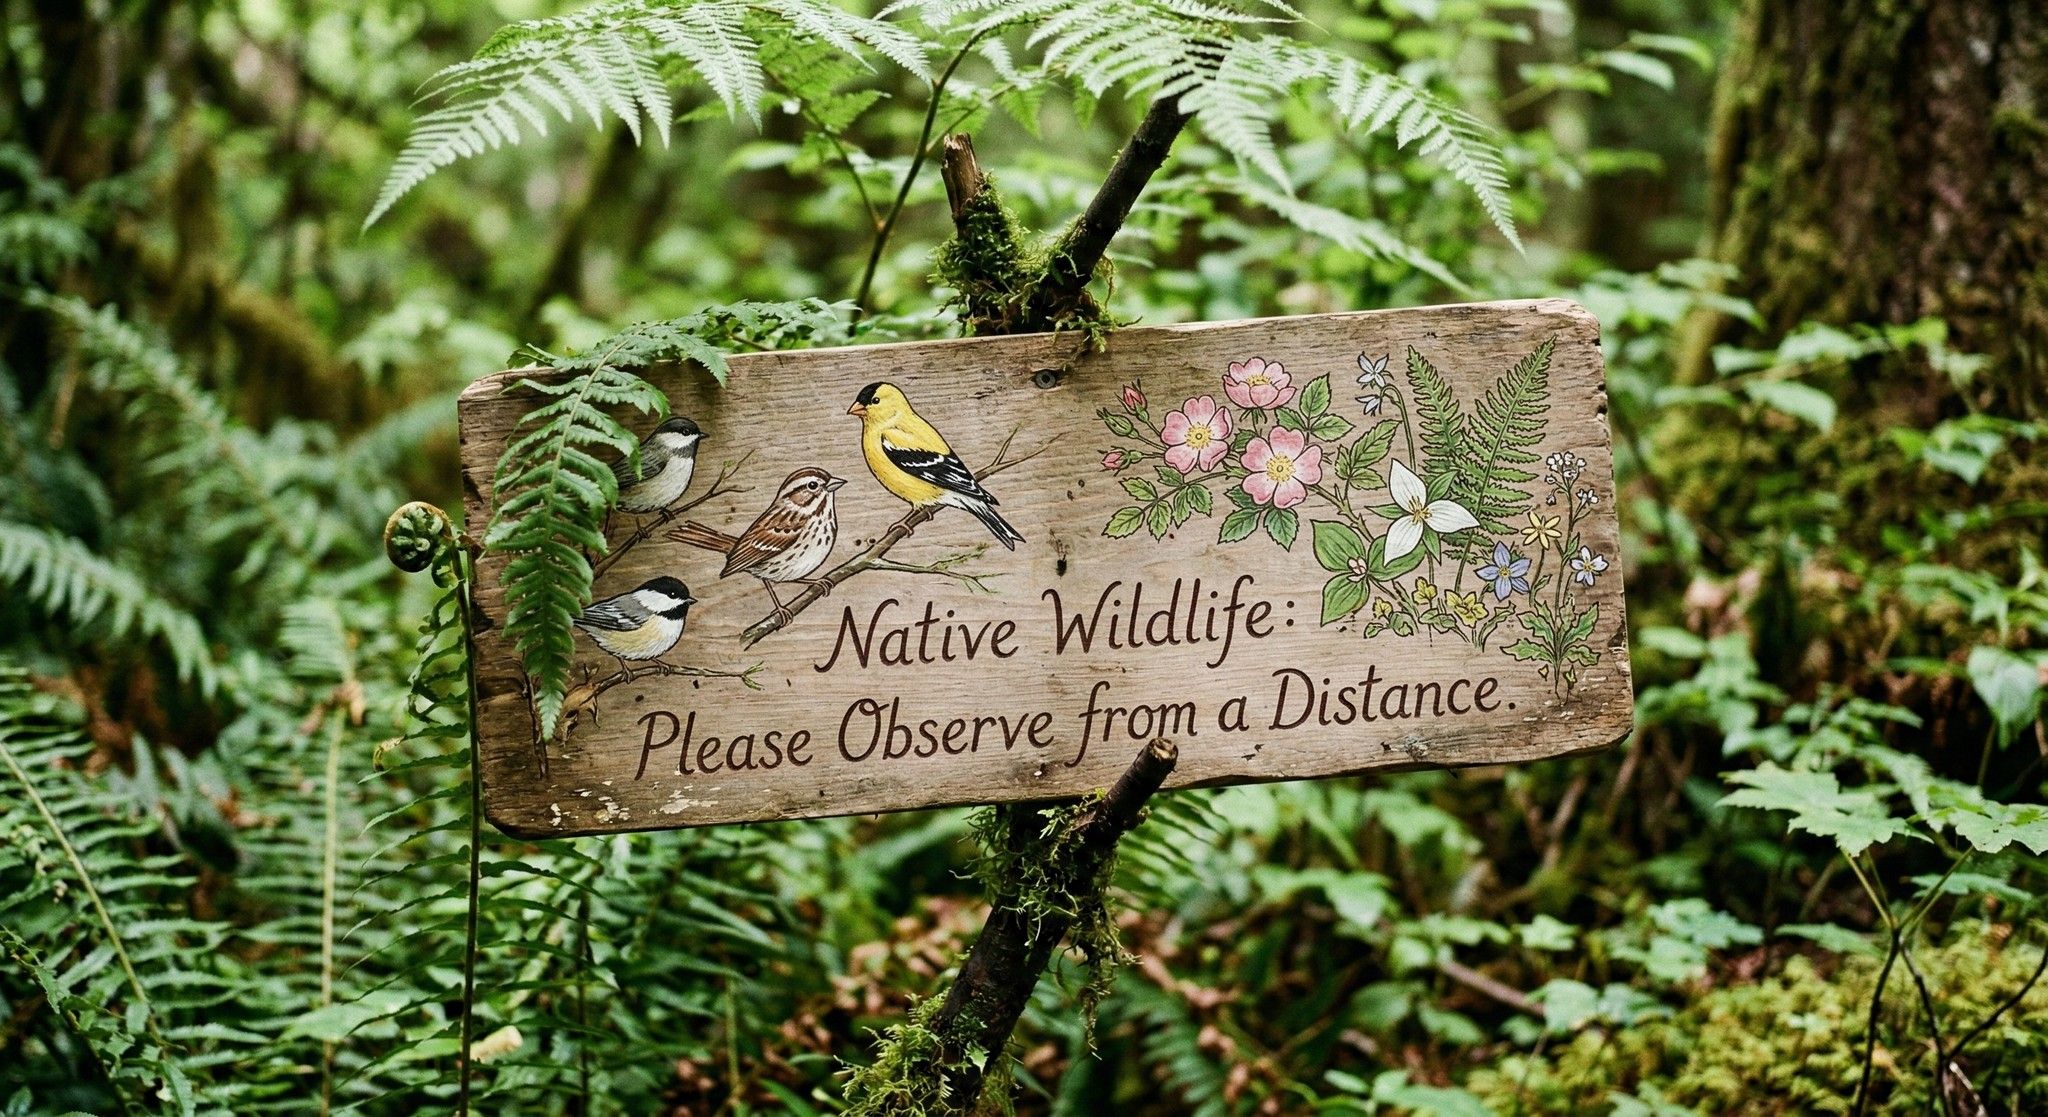
When you’re writing prompts for text rendering, follow these steps:
- Give the text a physical surface: a sign, chalkboard, product label, or book cover anchors the text inside the scene
- Describe the environment around it: lighting details like “soft diffused light through fern leaves” help the model render the whole image with consistent atmosphere so the text doesn’t look pasted in
- Write the text as part of the scene: treat it as something that exists in the world of the image, not something you’re adding on top
This approach has practical value across several use cases:
- Branded content mockups where readable text matters
- Scene-based storytelling with signs, labels, or written props
- Product photography concepts with visible packaging copy
It’s not perfect on every attempt, but the success rate is high enough that it’s worth building into your regular workflow.
How to Keep Up to 14 Characters Consistent in a Single Nano Banana 2 Image
Character consistency has always been one of the hardest problems to solve in AI image generation. Most tools struggle to keep even two characters looking the same across frames, let alone a full cast. Nano Banana 2 changes that in a meaningful way, maintaining recognizable identity for up to 5 characters and 14 objects in a single workflow.
Here’s how the process works:
- Upload reference images of your characters or products before writing your prompt
- Write a scene prompt that includes all the subjects you want to appear together
- Specify the atmosphere so the model understands the tone and composition you’re after
- Add a consistency instruction at the end to reinforce that identities must be preserved
The prompt that demonstrates this capability is:
“Create an image of these 14 characters and items having fun at the farm. The overall atmosphere is fun, silly and joyful. It is strictly important to keep identity consistent of all 14 characters and items.”
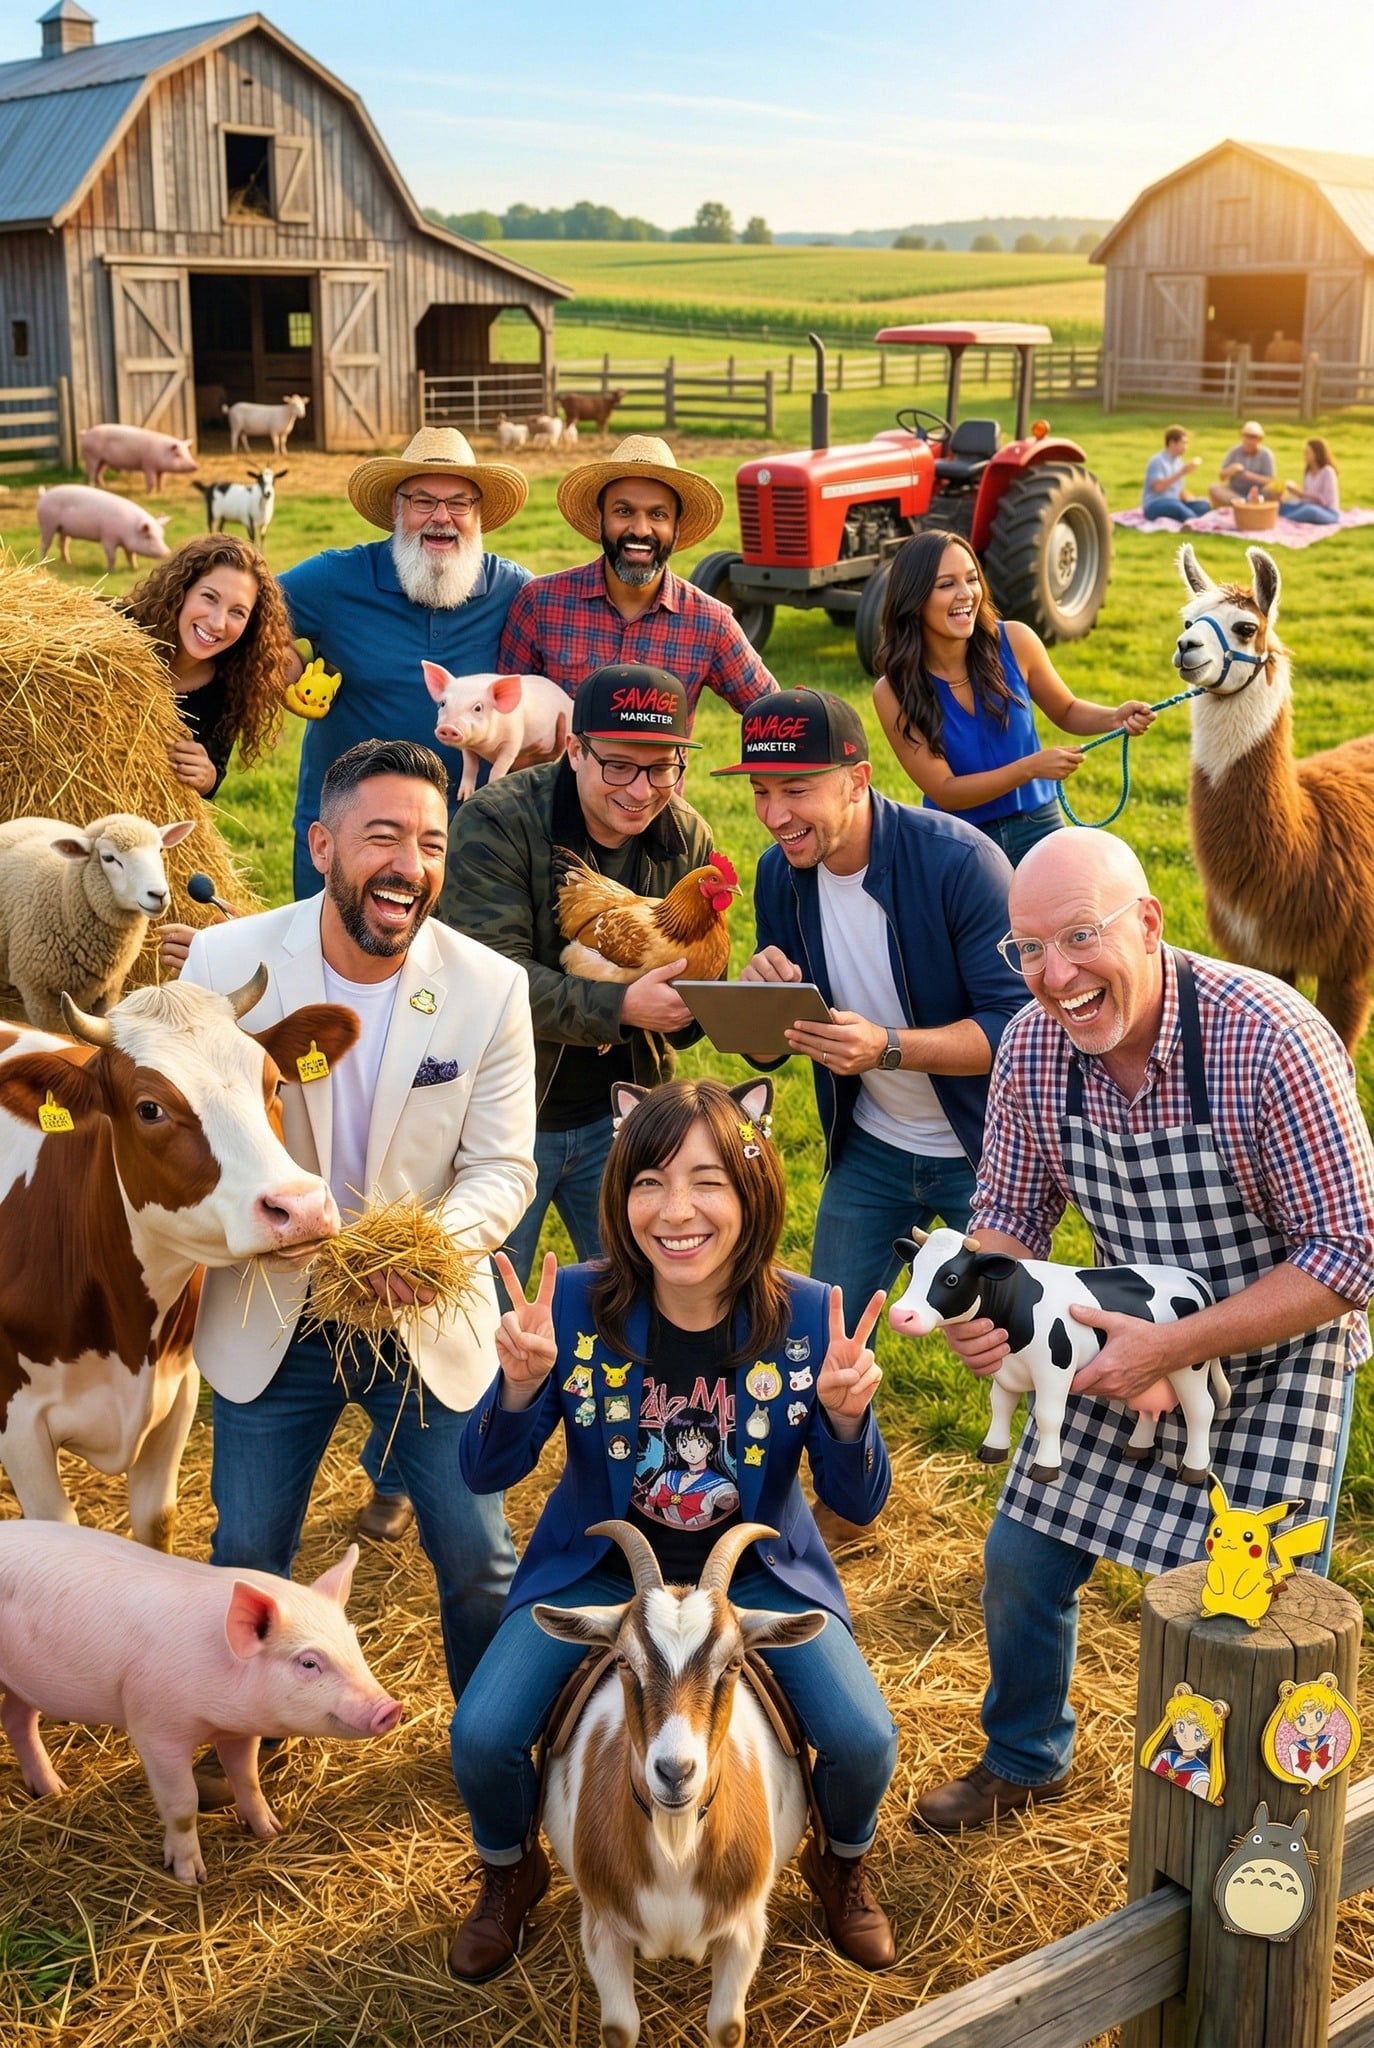
The phrase “strictly important to keep identity consistent” is doing real work here. It signals to the model that this is a hard requirement, not a suggestion.
Without that instruction, the model may drift on details like facial features, clothing, or product shapes when the scene gets crowded.
Here’s a quick breakdown of what Nano Banana 2 can handle in a single image:
| Consistency Type | Maximum Supported |
|---|---|
| Named characters | Up to 5 |
| Total objects and items | Up to 14 |
| Aspect ratio control | Full |
| Reference image uploads | Supported |
For content creators, this opens up workflows that previously required a human illustrator or multiple rounds of manual editing:
- Storyboarding for YouTube series or short films where characters need to look the same across every scene
- Brand content featuring multiple products in lifestyle settings
- Children’s book illustrations where character continuity across pages is non-negotiable
- Social media series built around recurring characters or mascots
The key habit to build is always uploading clean, well-lit reference images before you prompt. The model can only stay consistent with what it has to work from.
Blurry or inconsistent references will produce inconsistent outputs, no matter how well the prompt is written.
How to Generate Cinematic 4K Portraits With Nano Banana 2
Portrait generation is one of those areas where the gap between AI tools becomes very obvious very fast.
Flat lighting, generic expressions, and low-resolution outputs have been common complaints across most platforms.
Nano Banana 2 addresses this with resolution support that now runs from 512px all the way up to 4K, combined with full aspect ratio control.
The prompt that shows this off best is:
“Cinematic still of a young individual wearing an audacious suit with swirling electric blue and hot pink patterns. Wide lapels, bell sleeves, yellow collared shirt. Bright yellow heart-shaped sunglasses. Hands on hips in a confident pose. Solid cerulean blue background.”

Breaking down what makes this prompt produce a strong portrait:
- Lead with the shot type — “cinematic still” sets the visual language immediately and tells the model to treat this like a frame from a film rather than a generic headshot
- Be specific about clothing details — wide lapels, bell sleeves, and collar color give the model enough to build a distinct, intentional look rather than defaulting to something generic
- Describe the pose — “hands on hips in a confident pose” removes ambiguity about body language and composition
- Use a solid background — a clean, single-color background like cerulean blue keeps the subject sharp and makes the image immediately usable for social posts or marketing assets without further editing
Here’s a comparison of resolution options and where each one fits best:
| Resolution | Best Use Case |
|---|---|
| 512px | Quick drafts and concept testing |
| 1080px | Social media posts and stories |
| 2K | Blog headers and website banners |
| 4K | Print materials, high-res ads, detailed mockups |
The practical applications for cinematic portraits are wide. You can use them for:
- Social media content where a strong visual identity drives engagement
- Widescreen backdrops for YouTube channels or streaming setups
- Ad creative that needs a polished, editorial look without a full photo shoot
- Brand avatars or mascots rendered at print quality
One thing worth noting: the more specific your clothing and styling description, the better the output. Vague prompts like “stylish outfit” will produce generic results.
Treat the prompt like a costume brief handed to a wardrobe department, and the model responds accordingly.
How to Create Multi-Part Visual Stories
Multi-part storytelling is where Nano Banana 2 really separates itself from most AI image tools.
Keeping characters consistent across a single image is impressive enough, but maintaining that consistency across a sequence of six separate frames is a different challenge entirely.
This feature alone makes it worth serious attention for anyone producing serialized content.
The prompt that demonstrates this is:
“Create a funny 6 part story with these 3 fluffy friends building a tree house. The story is thrilling with emotional highs and lows ending in a happy moment. Keep attire and identity consistent. Generate 6 images one at a time in 16:9 format.”
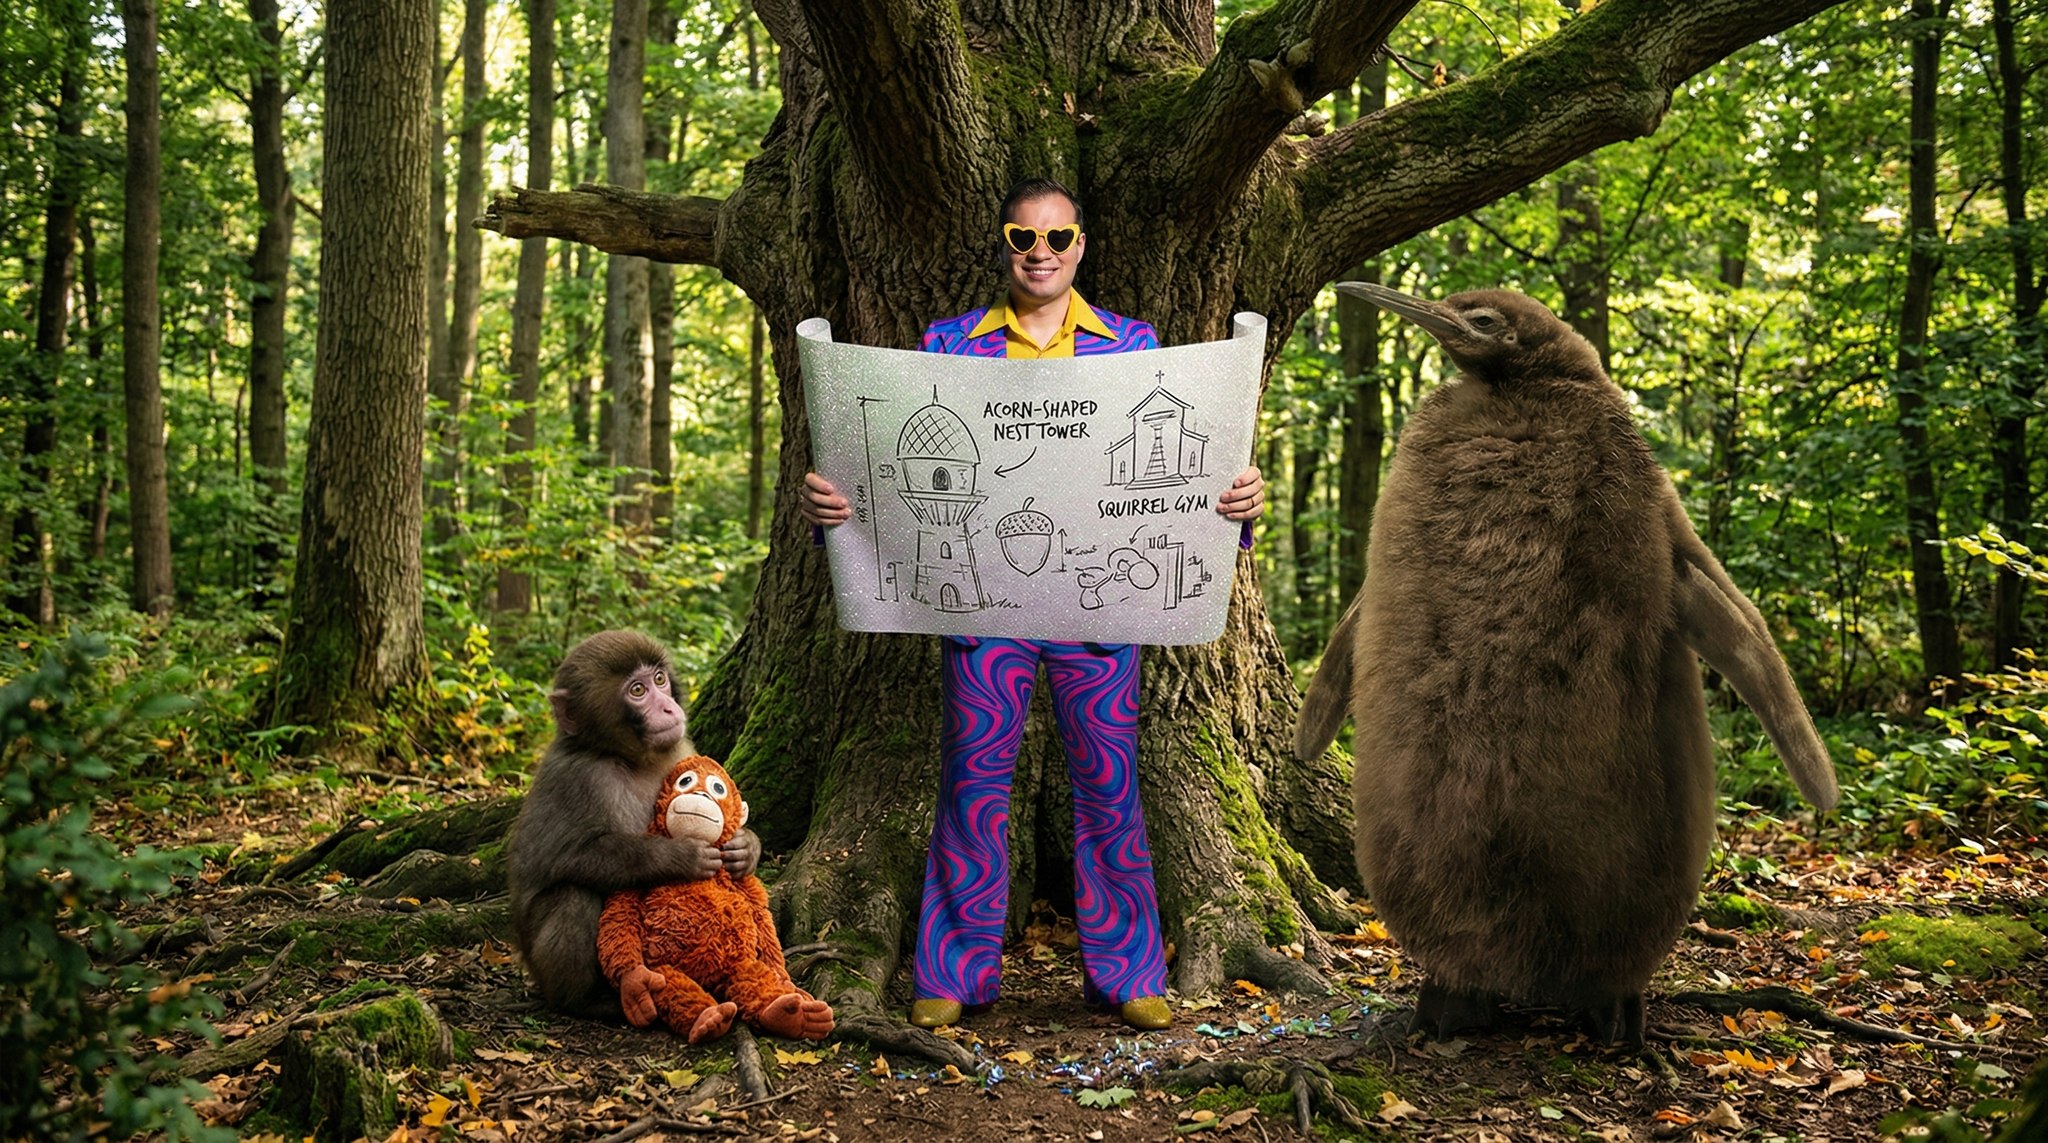
Here’s how to structure a multi-part story prompt for the best results:
- State the number of parts upfront: telling the model you want 6 image sets sets the pacing and scope before it starts generating
- Define the emotional arc: “thrilling with emotional highs and lows ending in a happy moment” gives the model a narrative structure to follow, rather than producing six disconnected scenes
- Add a consistency instruction: “keep attire and identity consistent” is essential here, just as it is with character-heavy single images
- Specify the format: 16:9 is ideal for YouTube thumbnails, presentations, and widescreen social content, so naming it upfront saves you from reformatting later
- Generate one at a time: this gives you control over each frame and lets you course-correct before committing to the full sequence
The content applications for this feature are genuinely broad:
- YouTube thumbnails built around a recurring character or storyline that runs across a series
- Children’s book illustrations where every page needs the same characters in new situations
- Social media series where each post is a chapter in a longer narrative
- Client storyboards for video production, ad concepts, or animated content pitches
- Educational content that walks a learner through a process using the same visual characters at each stage
Here’s a quick reference for matching story format to platform:
| Format | Aspect Ratio | Best Platform |
|---|---|---|
| Widescreen story | 16:9 | YouTube, presentations |
| Square series | 1:1 | Instagram feed, Facebook |
| Vertical story | 9:16 | TikTok, Instagram Reels |
| Portrait sequence | 4:5 | Instagram feed (portrait) |
| Print layout | Custom | Children’s books, storyboards |
The biggest mistake I see with multi-part prompts is writing them too loosely. If your emotional arc is vague, the model will produce images that feel random rather than sequential.
Think of it like pitching a short film. The more clearly you describe the beginning, middle, and end, the more coherent the sequence will be.
A prompt that says “6 fun images of friends” will not produce the same result as one that maps out a rising tension and a satisfying resolution.
This feature cuts production time dramatically while keeping the visual identity locked across every frame.