AI is now shaping how businesses manage customer support. Instead of relying on static chatbots or large support teams, you can now create automated systems that understand intent, respond accurately, and handle multiple queries simultaneously.
In this guide, I’ll walk you through how to build an AI customer support system using OpenAI’s Agent Builder.
You’ll learn how to set up intelligent routing, connect specialized support agents, and test everything before integrating it with your website.
This same workflow can power internal help desks, lead qualification systems, and automated sales assistants.
Once you’ve set it up, your support team can focus on complex issues while AI handles repetitive questions efficiently.
Want to learn how it all fits together?
Let’s start building.
Building the Core Logic of Your AI Support System
Every AI support system starts with a clear decision path. Without it, your bot can’t tell whether a user wants product help or a billing fix.
Agent Builder makes it simple to design that logic visually so your AI always knows where to send each query.
Begin at platform.openai.com/agent-builder and sign in. Once you’ve added credits, click + Create to open a new workflow.
You’ll see a blank canvas; this is where your routing logic will take shape.
The goal here is to give your AI the ability to understand intent. That’s what turns random messages into organized categories your agents can handle.
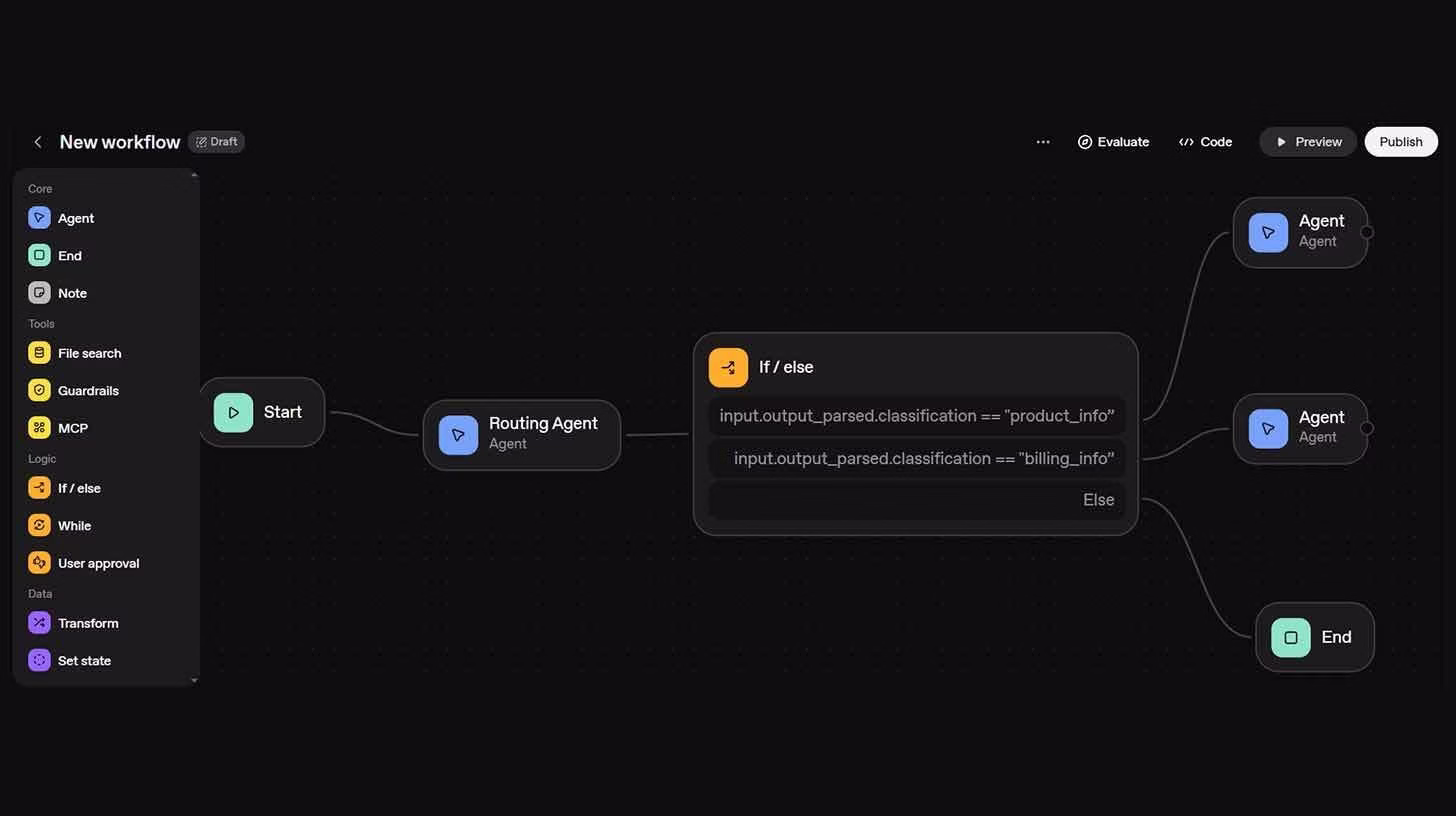
Create the routing agent
Add your first agent node and give it this prompt:
“You are a customer support classifier. Classify the user’s intent into ‘product_info’ or ‘billing_info.’”
Configure the output as structured JSON so later nodes can read it cleanly.Add a conditional block
Connect the routing agent to a logic node. Set the conditions so that “product_info” and “billing_info” each lead to separate paths.Preview early
Test short queries like “How do I reset my password?” and “I was charged twice.” If the workflow routes correctly, you’ve built a functioning logic core.
This structure becomes the foundation for everything else.
Once the intent is clear, specialized agents can take over with accurate responses that fit each situation.
Training Your Agents with Real Knowledge
With the logic in place, it’s time to give each path its own expertise.
A single generic bot can’t handle both product questions and payment issues well, which is why Agent Builder lets you upload documentation and files for each specialized agent.
Start by creating two separate nodes: one for product information and another for billing support.
Each will use your internal files to deliver specific answers.
Upload documentation using File Search
Add your product manuals, refund guides, or pricing sheets. This lets the AI pull data directly from your materials instead of guessing.Connect the new agents
Link each specialized node to its corresponding condition in the workflow. Now, when someone asks about features, it triggers the product agent. Billing issues go straight to the billing agent.Test and publish
Run test cases for both types of queries, then click Publish to generate a workflow ID. Use this ID to integrate your support system with Chatkit or embed it directly on your website.
Once everything works smoothly, your AI support system can handle most incoming queries automatically while your human team focuses on complex cases.
Expanding Your Workflow Beyond Support
Once your system handles customer queries smoothly, the same structure can power other business functions.
The logic you built for routing and intent classification isn’t limited to support; it’s the foundation of intelligent automation.
You can reuse this setup for:
Sales qualification: route leads based on interest level or budget.
Internal help desks: handle employee IT or HR questions automatically.
Lead scoring: classify incoming prospects by relevance before sending them to your CRM.
Each new version follows the same principle: use one routing agent, create specialized branches, and train each with context-specific files.
Over time, this turns your Agent Builder dashboard into a network of mini-workflows that scale across your business.
Adding a few small integrations, like notifications or CRM connections, can make the entire workflow more powerful without writing code.
Testing and Maintaining Your AI Workflow
After publishing, monitoring is what keeps your system effective. Every few weeks, test real-world questions from your customers.
See where the model hesitates or provides generic answers. This helps you refine prompts and files for better precision.
Keep your uploaded documents current. If your pricing or policies change, re-upload the new files so the AI always references the latest version.
When something breaks, for example, a classification error or slow response time, check your routing conditions first. Most issues come from small logic mismatches that are easy to fix.
Once everything runs smoothly, you’ll have a live AI support assistant that saves hours of repetitive work every day.